This blog provides a comprehensive step-by-step guide to setting up an LED control system using an ESP32 microcontroller, MySQL database, PHP scripts, and a web interface. The system allows users to control the state of an LED remotely through a web interface.
Prerequisites
Before proceeding with the setup, ensure you have the following:
- ESP32 development board
- Access to a web hosting service with cPanel (e.g., Name-cheap)
- Arduino IDE installed on your computer
- Basic knowledge of Arduino programming, HTML, PHP, and MySQL
Step 1: Set Up MySQL Database
1.1. Log in to cPanel
- Open your web browser and navigate to your cPanel URL (e.g., https://your_domain.com:2083/).
- Enter your cPanel credentials to log in.
1.2. Create a Database
- Navigate to the Databases section and click on MySQL Databases.
- Under Create New Database, enter a name for your database (e.g., led_control) and click Create Database.
1.3. Create a Database User
- Scroll down to MySQL Users.
- Enter a username and password for your database user, then click Create User.
1.4. Assign User to Database
- Scroll down to Add User to Database.
- Select the user and database you created, then click Add.
- Check All Privileges and click Make Changes.
Step 2: Create the led_control Table
2.1. Open phpMyAdmin
- In the cPanel dashboard, find and click on phpMyAdmin under the Databases section.
2.2. Select Your Database
- In phpMyAdmin, click on your database from the list on the left.
2.3. Create the Table
- Click on the SQL tab at the top.
- Enter the following SQL query to create the led_control table:

- Click Go to execute the query.
2.4. Insert Initial Record
- Enter the following SQL query to insert an initial record:

- Click Go to execute the query.
Step 3: Create PHP Scripts
3.1. Create update_led_status.php
- Open cPanel File Manager and navigate to the public_html directory.
- Click + File to create a new file named update_led_status.php.
- Edit the file and add the following PHP code:
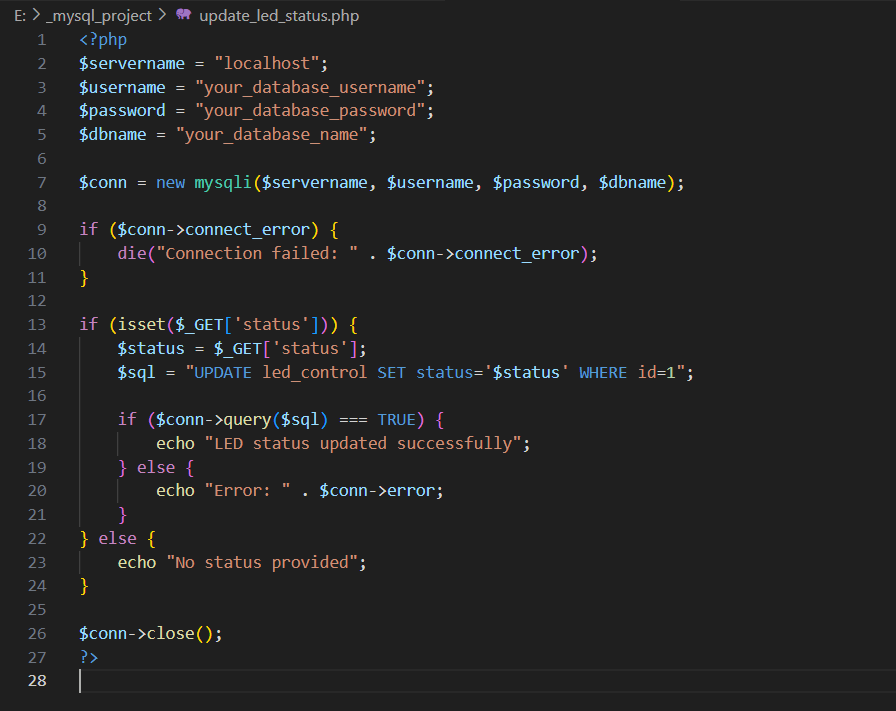
3.2. Create get_led_status.php
- Click + File to create a new file named get_led_status.php.
- Edit the file and add the following PHP code:
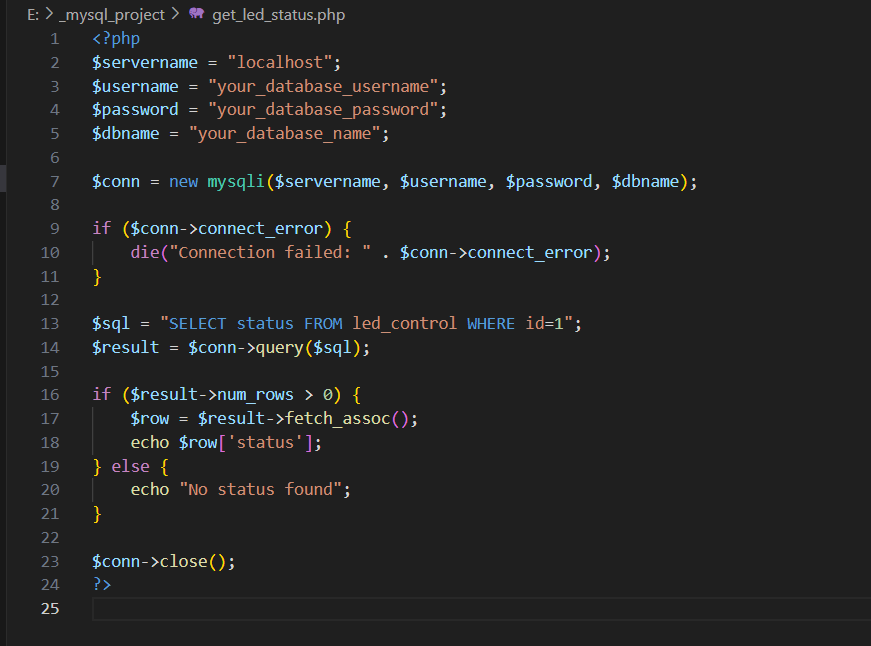
Step 4: Set Up ESP32 Code
4.1. Install Arduino IDE
- Download and install the Arduino IDE from arduino.cc.
4.2. Install ESP32 Board Package
- Open the Arduino IDE.
- Go to File > Preferences.
- In the Additional Board Manager URLs field, enter: https://dl.espressif.com/dl/package_esp32_index.json.
- Go to Tools > Board > Board Manager.
- Search for ESP32 and install the esp32 package.
4.3. Connect the ESP32
- Connect your ESP32 board to your computer via USB.
4.4. Write and Upload the Code
- Open a new sketch in the Arduino IDE.
- Copy and paste the following code into the sketch:
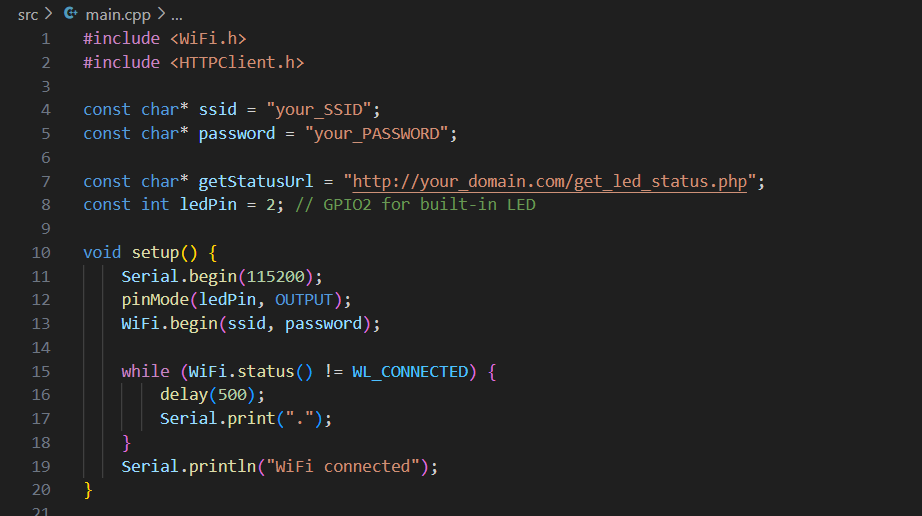
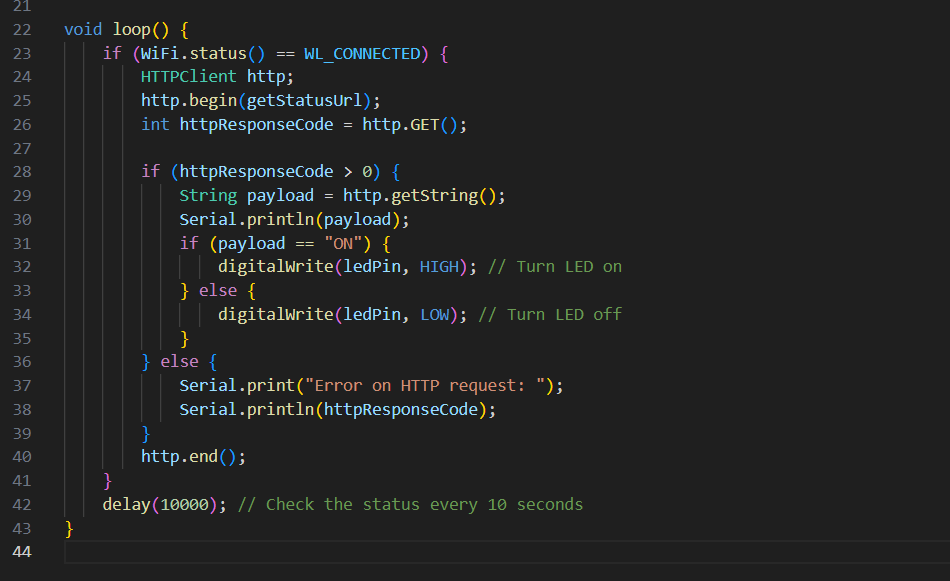
- Replace your_SSID, your_PASSWORD, and your_domain.com with your actual Wi-Fi credentials and domain name.
- Select the correct board and port from Tools.
- Click Upload.
Step 5: Create and Deploy the Web Interface
5.1. Create index.html
- In cPanel File Manager, navigate to the public_html directory.
- Click + File to create a new or upload this html file.
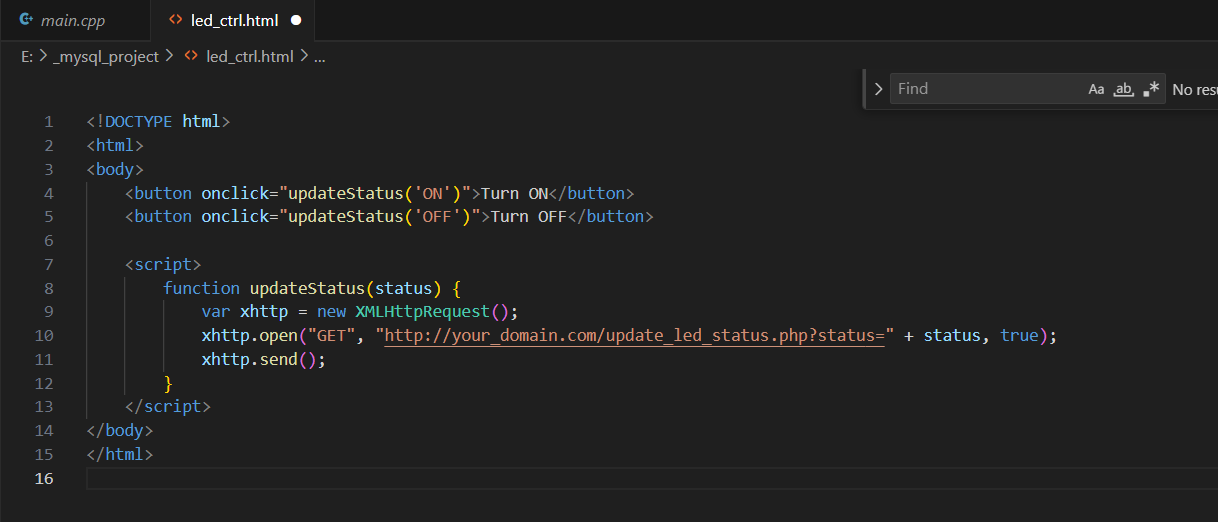
Now, you can control the LED using the web interface by accessing http://your_domain.com/index.html.
When you load index.html in your browser, the button will initially fetch and display the current status of the LED. Clicking the button will toggle the LED’s status and update the button’s color and text to reflect the change.
This setup allows you to control the LED connected to your ESP32 from a web interface hosted on your Namecheap*** server.
If you need more detailed guidance or encounter any issues, feel free to ask!
Summary
- Set up MySQL Database and Table: Create a database and a table to store the LED status.
- Create PHP Scripts: Write scripts to update and retrieve the LED status.
- ESP32 Code: Program the ESP32 to fetch the LED status from the server and control the LED accordingly.
- (Optional) Web Interface: Create a simple web interface to control the LED status.
Visual Guide
Here is a visual step-by-step guide to help you navigate through phpMyAdmin:
-
Open phpMyAdmin:
-
Select Database:
-
Go to SQL Tab:
-
Enter SQL Query:
Additional Tips
- Check for Errors: If the query does not execute successfully, phpMyAdmin will show an error message explaining what went wrong. Make sure the SQL syntax is correct and that the database is selected properly.
- Refresh Database View: After running the queries, you might need to refresh the database view to see the newly created table.
By following these steps, you should be able to create the led_control table in your MySQL database using phpMyAdmin.
Next Steps and Improvements
Here are a few ideas for expanding and improving your project:
-
Security:
- Add Authentication: Implement basic authentication or API keys to secure your PHP scripts.
- HTTPS: Ensure your website uses HTTPS to encrypt data sent between the server and clients.
-
Feedback in Web Interface:
- Show the current status of the LED in the web interface to provide feedback to the user.
- Display success or error messages when buttons are pressed.
-
Advanced Control:
- Add more controls for different functionalities (e.g., blinking patterns, brightness control).
- Use a more sophisticated UI framework like React or Vue.js for a richer user interface.
-
Monitoring and Logging:
- Log all changes to the LED status in the database to keep a history of actions.
- Monitor the ESP32’s connection status and provide alerts if it goes offline.
-
Mobile App:
- Develop a simple mobile app using frameworks like Flutter or React Native to control the LED from a smartphone.
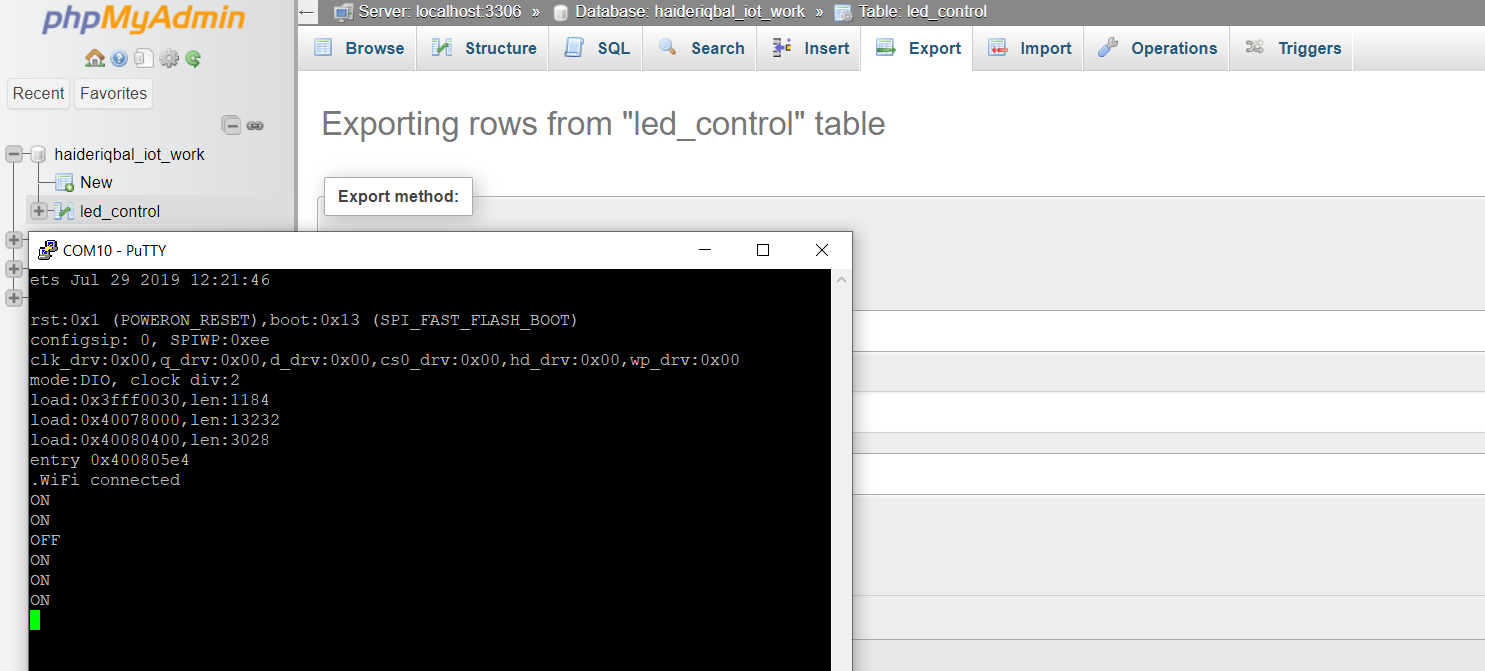
Project Output, I am using the putty for serial console.
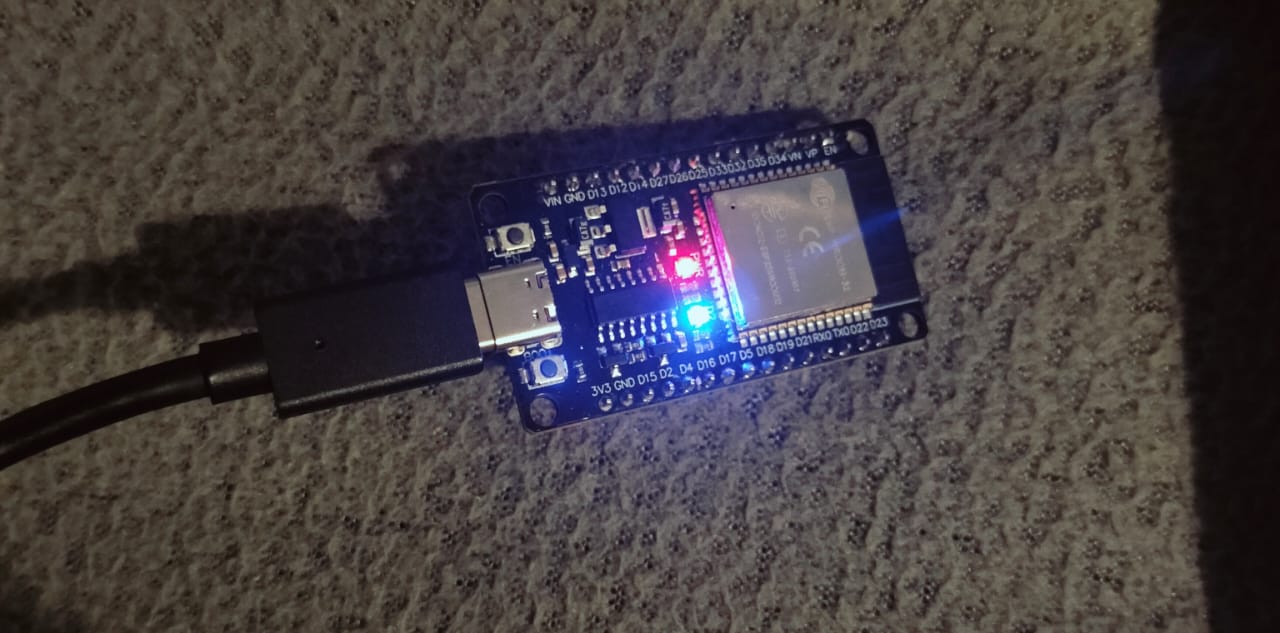
Hardware Output
If you encounter any issues, please let me know.
Reference Article: https://microcontrollerslab.com/esp32-mysql-database-php/
